The Grok AI API is a powerful language model interface that allows developers to integrate advanced AI capabilities such as natural language understanding, text generation, and intelligent automation into their own applications. Whether you’re building a chatbot, generating content, or automating tasks, Grok AI offers flexible endpoints and robust tools.
Integrating Grok AI can dramatically reduce development time for AI features, while offering high-quality output that rivals human performance. With privacy-first infrastructure and scalable pricing, Grok AI is an ideal solution for startups, SaaS platforms, and enterprise products.
This guide will walk you through everything from registering for the API to making advanced requests and implementing real-world applications. You’ll also learn best practices for using the API efficiently and securely.
You can access Grok through several platforms, as it’s designed to be user-friendly and integrated with xAI’s ecosystem.
Steps to Register for a Grok AI Account
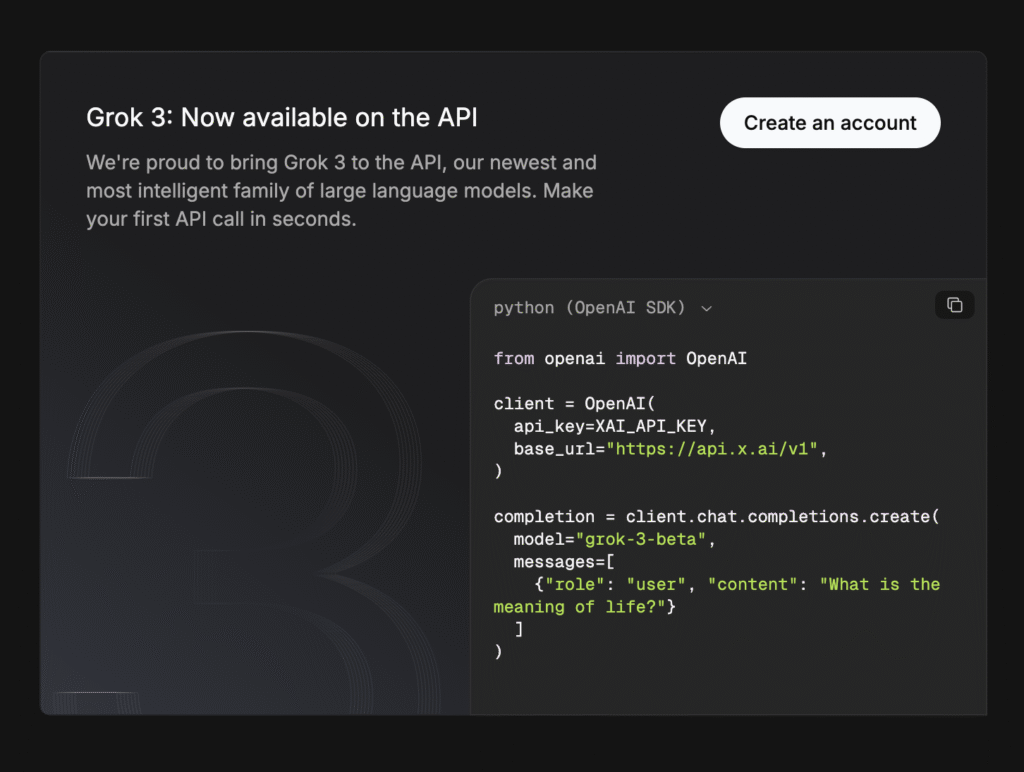
Via xAI API (For Developers):
1) Go to accounts.x.ai to create an xAI account.
2) Agree to xAI’s Terms of Service and Privacy Policy.
3) After registration, access the API at x.ai/api for enterprise-level usage.
Note: The API offers $25 free credits per month during the public beta, with costs at $2 per million input tokens and $10 per million output tokens.
Use Case: Ideal for developers integrating Grok into applications like customer support or automation tools.
Grok API uses a token-based pricing model, with several subscription tiers for different needs — from hobby projects to enterprise apps.
| Model | Mode | Input Tokens | Output Tokens |
|---|---|---|---|
| Grok 3 | Standard | $3.00 | $15.00 |
| Faster Inference | $5.00 | $25.00 | |
| Grok 3 Mini | Standard | $0.30 | $0.50 |
| Faster Inference | $0.60 | $4.00 |
Grok AI Model Pricing Overview
For the most current pricing and to generate an API key, visit the xAI developer documentation at https://x.ai/api or https://docs.x.ai.
Obtaining Your API Key
Once logged in:
Grok AI API provides access to several model variants that differ in performance, context window, and modality. Each is suited for specific tasks, from text-only interactions to multimodal applications.
You can select a model in your API request via the
modelparameter (e.g.,"model": "grok-3-mini").
You can access Grok AI API using any language that supports HTTP requests. Recommended tools include:
Official SDKs may be available. Otherwise, you can use raw HTTP requests. Example in Node.js:
npm install axios dotenvThen configure your API client:
require('dotenv').config();
const axios = require('axios');

const apiKey = process.env.GROK_API_KEY;
const headers = { 'Authorization': `Bearer ${apiKey}` };
Every request must include the API key in the `Authorization` header:
Authorization: Bearer YOUR_API_KEYconst response = await axios.post('https://api.grok.openai.com/v1/completions', {
prompt: "Explain quantum computing in simple terms.",
max_tokens: 100
}, { headers });
console.log(response.data);The response usually looks like this:
{
  "id": "chatcmpl-123",
  "object": "text_completion",
  "created": 1677858242,
  "choices": [
    { "text": "Quantum computing is...", "index": 0, "finish_reason": "stop" }
  ]
}If Grok supports chat-style history, structure your message like this:
{
  "messages": [
    {"role": "system", "content": "You are a helpful assistant."},
    {"role": "user", "content": "Tell me about AI"}
  ]
}
Streaming can reduce perceived latency and improve UX. Use WebSockets or keep-alive HTTP with event streams if supported.
When integrating with the Grok AI API, it’s important to anticipate and handle errors gracefully. The API uses standard HTTP status codes to indicate success or failure. Below is a summary of the most common ones you may encounter:
| Status Code | Meaning | Typical Cause |
|---|---|---|
| 200 OK | Success | Your request was processed correctly. |
| 400 Bad Request | Client error | Malformed input, missing parameters, or unsupported values. |
| 401 Unauthorized | Invalid or missing API key | The Authorization header is incorrect or not present. |
| 403 Forbidden | Permission denied | Your key is valid but doesn’t have access to this resource. |
| 429 Too Many Requests | Rate limit exceeded | You are sending requests too quickly or using more tokens than your plan allows. |
| 500 Internal Server Error | Server-side failure | Unexpected issue on Grok’s side. Try again later. |
| 503 Service Unavailable | Temporary outage | The API service is temporarily offline due to maintenance or overload. |
Error handling is essential for creating a stable, user-friendly application. The goal is to detect problems, inform the user appropriately, and retry or fail gracefully. Here’s a basic structure:
try {
  const response = await axios.post(endpoint, data, { headers });
  console.log(response.data);
} catch (error) {
  if (error.response) {
    console.error(\"Error:\", error.response.status, error.response.data);
    if (error.response.status === 429) {
      // Implement delay or queue logic here
    }
  } else if (error.request) {
    console.error(\"No response received:\", error.request);
  } else {
    console.error(\"Error setting up request:\", error.message);
  }
}try:
response = requests.post(endpoint, headers=headers, json=data)
response.raise_for_status()
print(response.json())
except requests.exceptions.HTTPError as err:
print(f\"HTTP Error: {err.response.status_code} - {err.response.text}\")
if err.response.status_code == 429:
time.sleep(1) # basic backoff
except requests.exceptions.RequestException as e:
print(f\"Request failed: {e}\")Without proper logging and monitoring, diagnosing production issues becomes guesswork. Implement real-time monitoring and centralized logging early in development to save time and frustration later.
| Tool | Use Case |
|---|---|
| Sentry | Exception tracking and user-level debugging |
| Datadog | Metrics, alerts, dashboards for infrastructure + APIs |
| Logtail | Real-time logging with structured output |
| Elastic Observability | Open-source logging, APM, and metrics |
Adding alerts for spikes in error rates or abnormal response times can help detect outages early and maintain high reliability.
API keys are sensitive credentials that grant access to your Grok AI account. If exposed, malicious users could deplete your usage limits, rack up charges, or compromise user data. Securing your key is essential both during development and after deployment.
.env files..gitignore.// .env
GROK_API_KEY=your_super_secret_key
// index.js
require('dotenv').config();
const apiKey = process.env.GROK_API_KEY;
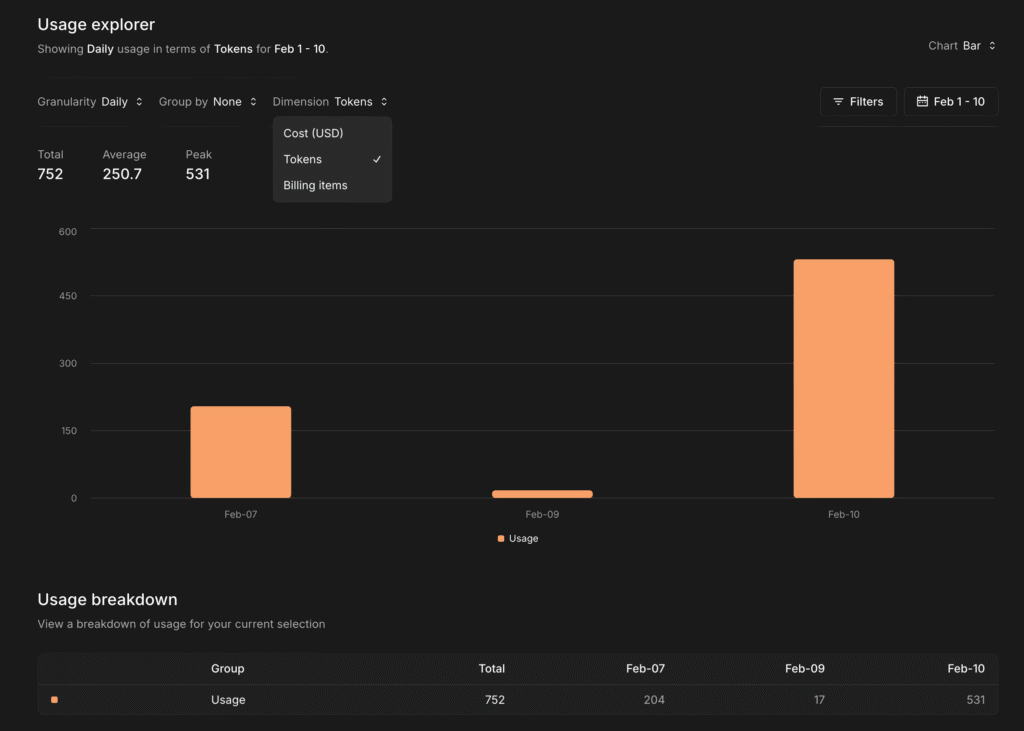
While Grok AI is powerful, it can become costly if used inefficiently. Understanding how tokens are consumed and how to minimize unnecessary usage will help you stay within your quota and budget.
max_tokens.const response = await axios.post(apiUrl, {
prompt: \"Summarize the article in one paragraph.\",
max_tokens: 150,
temperature: 0.7
}, { headers });
Also consider switching to a higher plan if your app grows—this reduces per-token cost and prevents service interruptions.
Prompt engineering is the art of writing effective inputs to get the desired output from a language model. Poor prompts can result in irrelevant or verbose results, while well-structured prompts return clearer, more actionable data.
| Bad Prompt | Improved Prompt |
|---|---|
| “Write about marketing.” | “Write a 150-word blog introduction on digital marketing trends in 2025.” |
| “Explain JavaScript.” | “Explain JavaScript closures to a beginner using simple code examples.” |
Grok AI enforces rate limits to protect its infrastructure and ensure fair use. If your app exceeds allowed limits, the API will respond with 429 Too Many Requests. Implementing smart rate limiting strategies ensures smooth operation even under load.
async function fetchWithRetry(url, data, retries = 3) {
  for (let i = 0; i < retries; i++) {
    try {
      const response = await axios.post(url, data, { headers });
      return response.data;
    } catch (err) {
      if (err.response && err.response.status === 429) {
        await new Promise(resolve => setTimeout(resolve, 1000 * (i + 1))); // exponential backoff
      } else {
        throw err;
      }
    }
  }
  throw new Error(\"Max retries exceeded\");
}
For high-traffic apps, consider using rate-limiting libraries like bottleneck (Node.js), or server-based solutions like Redis-backed job queues (e.g., Laravel Horizon, BullMQ).
Grok AI API is not just a tool for experiments — it’s already being used to power serious applications across industries. From conversational interfaces to content automation and embedded SaaS features, developers are using Grok to create smarter, more useful tools that enhance productivity and user engagement.
One of the most popular and impactful uses of the Grok AI API is building intelligent chatbots. These bots can provide 24/7 assistance, answer common questions, and even carry on meaningful conversations that feel natural.
{
  "messages": [
    { "role": "system", "content": "You are a friendly customer support bot for an e-commerce store." },
    { "role": "user", "content": "Where is my order?" }
  ]
}
By maintaining conversation history and using structured prompts, you can easily create chatbots that feel coherent and remember context.
With Grok AI’s language generation capabilities, developers are building tools that automate creative and marketing content. These tools save time, reduce writer’s block, and produce consistent outputs at scale.
Generate a 150-character Instagram caption for a coffee brand launching a new cold brew product.
You can also allow users to fine-tune tone, length, or format (e.g., funny, inspirational, list-style), giving non-technical users creative superpowers.
Support teams benefit greatly from AI that can understand and respond to customer issues quickly. Grok AI helps automate support in both synchronous (live chat) and asynchronous (ticketing/email) contexts.

Summarize this support message:
\"Hi, I ordered a laptop two weeks ago but I still haven’t received a shipping update. Can you check if there’s a delay?\"
Output: “Customer inquiring about shipping delay for laptop order placed two weeks ago.”
SaaS developers are embedding Grok AI features directly into their products to deliver smarter UX and new functionality. This integration can differentiate your app while increasing stickiness and value.
// User types in a marketing dashboard:
\"Summarize our Q1 Facebook ad performance.\"

// Grok AI API processes internal report text and returns:
\"Q1 saw a 35% increase in CTR and a 20% decrease in CPC, driven by retargeting campaigns.\"
This kind of embedded assistance helps users complete tasks faster and with more confidence—without needing to leave your platform.
By now, you should have a clear understanding of how to integrate and work with the Grok AI API from start to finish. Here’s a quick recap of the essential steps covered in this guide:
Start small, experiment frequently, and keep improving your prompts based on results. AI behavior is highly dependent on prompt quality and structure, so don’t hesitate to iterate. Use staging environments to fine-tune before going live, and remember that user privacy and error handling are just as important as feature completeness.
Also, explore opportunities to combine Grok AI with other tools in your stack—like databases, webhooks, or low-code platforms. You’ll be surprised how much power you can unlock by chaining AI with automation.
Lastly, don’t forget to stay current. AI APIs evolve fast — new parameters, models, and capabilities are introduced regularly. Keep an eye on the changelogs and developer forums to stay ahead.
Whether you’re troubleshooting an integration or exploring more advanced use cases, there’s a growing ecosystem of tools and documentation to help you succeed.
You’re now equipped with the knowledge and tools to integrate Grok AI into your app or product effectively. Whether you’re building something personal or launching a commercial product, Grok gives you the foundation to create powerful, intelligent experiences.
Good luck —and build something remarkable.